Networking | Linux | FOSS | Note-Keeping |

Pages

Showing posts with label Lab Practice. Show all posts

Friday, March 29, 2019

Cisco Packet Tracer 7.2.1 Installation on Ubuntu 18.04 LTS Linux

Cisco Packet Tracer v7.2.1 was released in mid 2018, which doesn’t appear to need libicui18n.so.52 unlike CPT v7.1 (The bug was fixed in the latest release and v7.2.1 runs without any issue on Ubuntu 16.04). However, CPT v7.2.1 on Ubuntu 18.04 is unable to locate libpng12. Following solution (QT Libraries, libcu52 and libpng12 installation) fixed it for me:

Install Qt libraries:


sudo apt install libqt5webkit5 libqt5multimediawidgets5 libqt5svg5 libqt5script5 libqt5scripttools5 libqt5sql5


Install libcu52:


wget http://mirrors.kernel.org/ubuntu/pool/main/i/icu/libicu52_52.1-3ubuntu0.8_amd64.deb

sudo dpkg -i libicu52_52.1-3ubuntu0.8_amd64.deb

Install libpng12:


wget http://ftp.debian.org/debian/pool/main/libp/libpng/libpng12-0_1.2.50-2+deb8u3_amd64.deb

sudo dpkg -i libpng12-0_1.2.50-2+deb8u3_amd64.deb

Now, CPT should start correctly via 'packettracer' command in terminal.


Credits: 

Stack Exchange

Share:

Wednesday, March 7, 2018

Unable to login via HTML5 console on EVE-NG

Issue:
Unable to login via HTML5 console on EVE-NG's Web GUI after upgrade to EVE-NG 2.0.3-86 or when in HTML5 console, disconnect button gets you into a guacamole login page and can’t get any sessions in HTML5.

Solution:

This is a typical corrupt Guacamole SQL database issue; whether happened randomly or even during/after eve upgrade process, there are two very simple proposed solutions for this problem:
  1. Logout/Login from/into eve to be able to open html console again.
    or
  2. Issue the following command on eve-ng vm:
    #cat /opt/unetlab/schema/guacamole-update.sql | mysql -u root --password=eve-ng guacdb
    and than login/logout from/into eve.
HTH,
Rana Tauqeer.
Share:

Setting SecureCRT as default telnet handler for EVE-NG devices on Firefox.

While doing Lab practice on EVE-NG's Web GUI on Firefox Web-browser, telnet (by double click or right-click console option) to a network device opens Ubuntu's default terminal (Gnome Terminal) via 'xdg-open' script from 'xdg-utils' by default. Console to multiple devices opens a new instance of Gnome Terminal for each telnet session, which for me is not handy and makes it too messy! 

I'm rather a SecureCRT fan, and have always preferred it over other available terminal emulators due to it's awesome features and handy tools. So, I was trying to find a way to open the EVE-NG's telnet:// or ssh:// links directly via SecureCRT. Manual telnet/SSH from SecureCRT to EVE-NG's devices works fine by default, but, this becomes hectic for full scale CCIE Labs having over 50 or more devices running.


With the help of VanDyke Technical Support, I was able to figure out a way to get Firefox on Ubuntu to prompt you for which application to open SSH/Telnet links with.


Following instructions can make it possible:

  • Open Firefox and type “about:config” in address bar.
  • Create a new Boolean preference (right click on an empty space), name it
    network.protocol-handler.expose.telnet” (without inverted commas) for telnet handler, and set the value “false”.
  • Create another new Boolean preference (right click on an empty space), name it
    network.protocol-handler.expose.ssh” (without inverted commas) for ssh handler, and set the value “false
  • Restart the browser.
This should be enough for Firefox to let us select an external application to open “telnet://” links. 
While testing I would suggest leaving the "Remember my choice for ..." option unchecked. When prompted you should be able to select SecureCRT, by default it is located at /usr/bin/SecureCRT.

PS:

I'm using latest SecureCRT 8.3.2 on Ubuntu 16.04.4 LTS (Xenial) and while attempting various suggested workarounds, messed up SecureCRT's Tab feature (it kept opening new sessions in new instances rather than in tabs).

There is a work around that you could try. It would force SecureCRT into Single Instance mode, though you would not be able to open two separate instances of SecureCRT.


To accomplish this:

  • Locate the config folder info in the General / Configuration Paths category of SecureCRT's Global Options
  • Close all instances of SecureCRT/FX
  • Navigate to your SecureCRT configuration folder
  • Locate and open the Global.ini file
  • Find the line containing "Single Instance"
  • Modify the line to D:"Single Instance"=00000001
  • Save the changes to Global.ini
Now that SecureCRT is in Single Instance mode any link selected should open in a new tab.

HTH,

Rana Tauqeer.

Share:

Tuesday, November 21, 2017

SerureCRT 8.3 installation on Ubuntu 16.04LTS Linux

This tutorial uses SerureCRT 8.3 - Nov 9, 2017 release running on Ubuntu 16.04LTS machine, follow the steps below and enjoy fully featured rock-solid terminal emulation:
  • Download the latest SecureCRT for Linux Ubuntu 16.x 64-bit (scrt-8.3.0-1514.ubuntu16-64.x86_64.deb) from official Website 
  • Double click the downloaded .deb file, and install it through Ubuntu Software Center for ease.
  • Open a terminal (Ctrl+Alt+t) and download the perl script:
    rana@Ubuntu16:~$ wget http://download.boll.me/securecrt_linux_crack.pl
  • Check out the SecureCRT installation path:
    rana@Ubuntu16:~$ whereis SecureCRT
    SecureCRT: /usr/bin/SecureCRT 
  • Run the perl script on SecureCRT's installation path '/usr/bin/SecureCRT':
    rana@Ubuntu16:~$ sudo perl securecrt_linux_crack.pl /usr/bin/SecureCRT
    If the script is successful, the registration information output will be generated in terminal.
  • Now, run 'SecureCRT' command in terminal and follow the prompts to fill out the registration information output in 'Enter License Manually' Tab.
  • All Done!


(Script share is just for the sake of testing/educational purposes and do not endorse cracking, use in production or intend to violate any copyrights. Please, properly give credits to the developers; download trial and buy the most awesome SecureCRT - Peace!)

HTH,
Rana Tauqeer.
Share:

Monday, November 20, 2017

GNS3 2.0.3 Error on Ubuntu 16.04LTS: IOS/IOU_name.bin%20is%20not%20executable

GNS3 2.0.3 Error Message on Ubuntu 16.04LTS:

home/rana/GNS3/images/IOU/i86bi-linux-l2-adventerprisek9-15.6.0.9S.bin%20is%20not%20executable


Some fellows came across the above error, while adding/configuring IOS/IOU on GNS3 2.0.3 and the development version GNS3 2.1.0 running on Ubuntu 16.04LTS machines. The error message is self explanatory, and just needs you to add execution rights to the IOS/IOU files in GNS3's images directory, like below and can be repeated for all IOS/IOU giving the same error:

(The below example assumes GNS3's default directories, and shows rights inclusion to L2 IOU, L3 IOU and a c7200 router IOS, just open a terminal with Ctrl+Alt+t, and do the following from '/home/user' directory)


rana@Ubuntu16:~cd GNS3/images/IOU
rana@Ubuntu16:~/GNS3/images/IOU$ sudo chmod +x i86bi-linux-l2-adventerprisek9-15.6.0.9S.bin
[sudo] password for rana: 
rana@Ubuntu16:~/GNS3/images/IOU$ sudo chmod +x i86bi-linux-l3-adventerprisek9-15.4.1T.bin
rana@Ubuntu16:~/GNS3/images/IOU$ cd ..
rana@Ubuntu16:~cd GNS3/images$ cd IOS
rana@Ubuntu16:~/GNS3/images/IOS$ sudo chmod +x c7200-adventerprisek9-mz.153-3.XB12.bin
rana@Ubuntu16:~/GNS3/images/IOS$ 

Now, open GNS3 again and add the IOS/IOU again in Preferences Tab, everything should work as intended.


HTH,
Rana Tauqeer.
Share:

Cisco Packet Tracer 7.1 Installation on Ubuntu 16.04 LTS Linux

Cisco Packet Tracer (CPT) is a free Network and IoT Simulation & Visualization tool for starters in Cisco Networking Technologies. Packet Tracer's 32bit & 64bit versions are available for Microsoft Windows 7, 8.1 and 10, and a 64-bit version is available for Linux (Not available for macOS at this time). This tutorial will focus on installing Cisco Packet Tracer 7.1 on Ubuntu 16.04.3 LTS (Same process is valid for all Debian Linux based Distros):
  • Download Packet Tracer 7.1 from Cisco Networking Academy (NetAcad)
    (you must be a member of NetAcad to download CPT)
  • Open a terminal (by pressing Ctrl + Alt + t), and change directory to the downloaded file location (/home/User/Downloads' in this case) and extract the downloaded .tar file :
    $ cd ~/Downloads
    $ tar -xzvf Cisco_PacketTracer71_64bit_linux.tar.gz
  • Start the installation by typing '/.install' in extracted files directory:
    $ cd Cisco_PacketTracer71_64bit_linux
    $
    sudo ./install
  • You will be asked to read the terms (EULA):
    (Keep pressing 'Enter' key until EULA is read 100%)
  • Now you'll be asked to accept EULA:
    Do you accept the terms of the EULA? (Y)es/(N)o(Press 'Y' to accept EULA)
  • Enter location to install Cisco Packet Tracer or press enter for installation in default directory [/opt/pt]:
    (Press ‘Enter’ key to select the default location /opt/pt )
  • Now, you'll be asked, Should we create a symbolic link "packettracer" in /usr/local/bin for easy Cisco Packet Tracer startup? [Yn] (Press 'Y' to create a symbolic link)
  • After completion of installation, launch Packet Tracer 7.1 by typing packettracerin terminal.
    $packettracer
    Starting Packet Tracer 7.1
  • Enter your Cisco NetAcad Credentials to login or login as guest.


PS:

Some folks have reported that their Packet Tracer installation completed successfully, but 'packettracer' command didn't open CPT, and no error message was shown, like below: 
rana@Ubuntu16:~$ packettracer
Starting Packet Tracer 7.1
rana@Ubuntu16:~$ 
In this case, follow the below solution:
  • Open a terminal, and download Debian package containing the older version of 'libicui18n' (CPT requires libicui18n with an older version '52' instead of '55', which is not available in Ubuntu16.04 LTS.)
  • $wget http://security.ubuntu.com/ubuntu/pool/main/i/icu/libicu52_52.1-3ubuntu0.7_amd64.deb
  • Install the .deb package
    $sudo dpkg -i libicu52_52.1-3ubuntu0.7_amd64.deb
  • Now CPT should start correctly via 'packettracer' in a terminal.
    [Credits: Steve]

HTH,
Rana Tauqeer.
Share:

Thursday, August 24, 2017

How To Run Juniper Router JunOS Olive VM image(.OVA) in GNS3

How To Run Juniper Router JunOS Olive VM image (.OVA) in GNS3


First of all, download, install and run Oracle VM VirtualBox, and GNS3 on your PC.

Secondly, download the JunOS Olive VM image from the link below:

Download JunOS image file for GNS3

(Link searched from internet and pasted here for reference only)

After downloading the JunOS VM image, open the Oracle VM VirtualBox console. Click File and select Import Appliance to import VM (or just double click on the downloaded file and run it with Oracle VM VirtualBox to Import Appliance.)

Now, click the Browse button to locate the downloaded JunOS image file, select it, and then click Next

Accept the default resource values or adjust them as per requirement, and then click Import.
(I'm using default values that came with downloaded VM.


Once the VM is imported, select it, and click Start to power on.

Note:
In case, while importing the Virtual Machine in Oracle VM VirtualBox, you get the error "could not start the machine because following physical network interfaces were not found" than click Change Network Settings, select Microsoft KM-TEST Loopback Adapter from the list, and then click OK.
(If Microsoft Lopback Adapter is not already installed, than install it via the "Add Hardware Wizard" on windows and than select it in network settings)
If this error does not occur than, skip this step.


Now, on GNS3, click Edit, and select Preferences. On the Preferences window, select VirtualBox VMs in the left pane, and then select New.
Select JunOS Olive VM (Juniper router IOS image)and click Finish.


Now click Edit, change Symbol & Category to Router. Move on to the Network tab, and set the number of adapters as per your requirement (I selected 4 here)
Also, Select the Allow GNS3 to use any configured VirtualBox adapter check box and click OK. Now again press Apply & OK.


Now, in GNS3 console GUI, drag & drop the Junos router and start it.


Switch to the JunOS VirtualBox console or go to console from GNS3. At the login prompt, type root as username and press Enter. The Password is blank
At the next prompt, type cli and press Enter, and "Show Version" to verify the Junos version.


Enjoy.

Share:

How to run Juniper Router (JunOS) .img in GNS3

Installing Juniper Router IOS (Junos) .img via GNS3 Qemu on Local Computer or GNS3 VM:


Pre-requisites
  • GNS3 installed
  • VMWare or Oracle VM VirtualBox installed (If you want to install to VM)
  • Juniper Router IOS (Junos) .img file

Adding Junos in GNS3

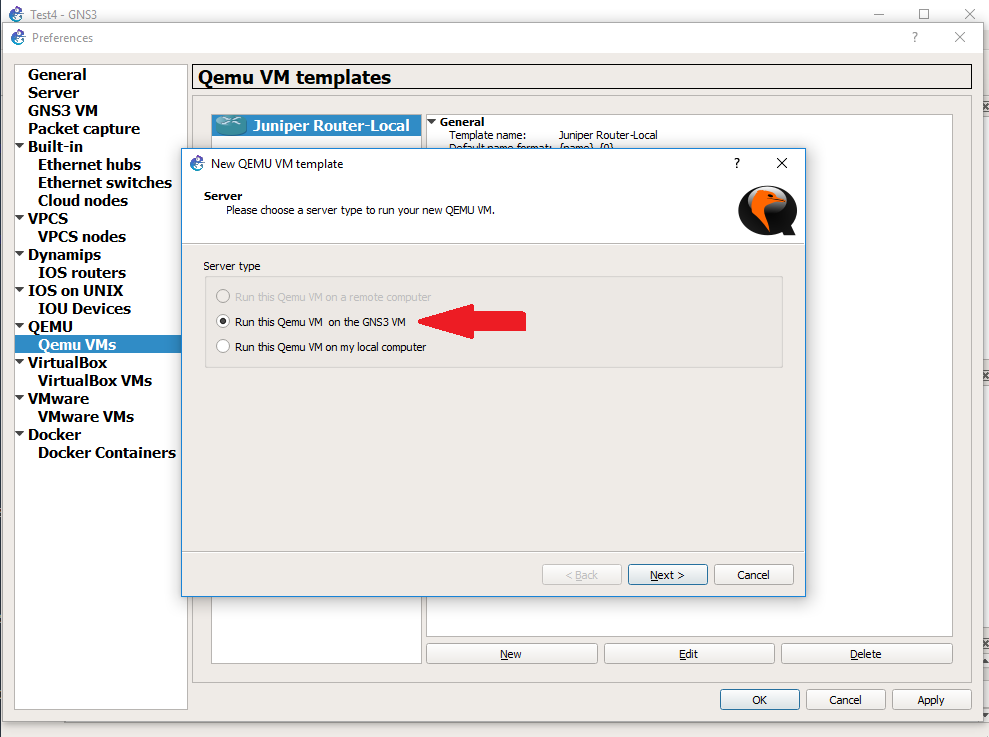
Open GNS3 and go to Edit > Preferences > QEMU > QEMU VMs

Select "Run this Qemu VM on the GNS3 VM" for running Junos on VM
or
select "Run this Qemu VM on local computer" for running Junos on local computer and press Next (I’m running it on VM here).


Name the Junos here and press Next


Select Qemu Binary and RAM here and press Next (I’m using auto-selected default Qemu binary values by GNS3 and 256MB of RAM)


Choose Consol Type here (I selected Telnet) and press Next


Now, choose basic disk image for the virtual machine, if you haven’t already chosen/uploaded it to VM than select New Image and give path to Junos.img file and it will start uploading .img file to VM. Give it some time to upload and press Finish. (I had it already uploaded to VM earlier while testing so, chose Existing Image and selected the .img file from drop down menu)
Click Apply and OK


To change the Junos Router Icon, press all devices icon from the left hand menu, select Junos router and right click on it. Click on Configure Template. Now change the Symbol from Browse option and select router icon from the list. Also, change the Category from drop down menu and select Routers.


Change Network Adapters to 4 (Maximum supported by QEMU) or according to your need and press OK.


Now, you are all set to test the settings.


Drag & Drop the Junos router to the main topology window, turn it on, and get console access. Give it some time to boot (At least 4-5 minutes)


After Successful boot, login with "root" and press enter & to enter into Junos CLI mode type "cli" and press enter. 


Enjoy!
Share:

Friday, August 18, 2017

Even/Odd RIP Route Filtering - Wildcard Mask Explanation!


Explanation:
When we assign an IP address to an interface, the operating system performs a process called ANDING. Let's say the IP address is 2.2.2.2 with a Subnet Mask of 255.255.255.0, the operating system will perform ANDING, which is nothing but a multiplication. Basically, 1 multiply by 1 is 1, 1 multiplied by 0 is 0, and 0 multiply by 0 is 0. You may think this is too easy, where is he going with this. Let’s go through the process and you will see:

00000010.00000010.00000010.00000010     à The Network
11111111.11111111.11111111.00000000     à The Subnet Mask
-------------------------------------------------------

00000010.00000010.00000010.00000000     à The Result

è 2.2.2.0


As we can see the result of the ANDING is 2.2.0.0, and this is the network, So, when we assign an IP address and a Subnet Mask, the operating system performs ANDING to get the network address.

In IOS, we can use Subnet Mask and/or an Inverse Mask. Why we use Inverse Mask? Because we can have discontinuous ONEs, whereas, in Subnet Mask we can NOT.

To convert an inverse mask to a regular mask, we can subtract the inverse mask from 255.255.255.255.

Now, let’s go over the Access-List 2.2.1.0 With an inverse mask of 0.0.254.0
Let’s do ANDING, but before we do ANDING we have to convert the inverse mask to regular mask, let’s do that:
255.255.255.255 – 0.0.254.0 = 255.255.1.255

Now, let’s do ANDING:
00000010.00000010.00000001.00000000
11111111.11111111.00000001.00000000
--------------------------------------
00000010.00000010.00000001.00000000

è 2.2.2.0

So, the result of ANDING is 2.2.1.0, and if the result is 2.2.1.0 based on the ACL it is denied.
Now, let’s see if 2.2.3.0 is allowed:
00000010.00000010.00000011.00000000
11111111.11111111.00000001.11111111
-------------------------------------------------------
00000010.00000010.00000001.00000000

è 2.2.2.0

WOW, you can see the result of the ANDING is the same 2.2.1.0, we can see that if 2.2.5.0 is used it will still AND to 2.2.1.0 which is ODD in the third octet. So, all ODD numbered third octet will AND to 2.2.1.0 and it is denied. 

NOW, is 2.2.2.0 is looked at, it will AND to 2.2.0.0, and based on the ACL it will be permitted, so as a result all the EVEN numbered third octet subnets will be allowed, and all the ODD numbered third octet subnets will be denied. 


Credits:
CCIE by Mr. Narbik Kocharians © 2014
CCIE R&S Foundation v5.0 Workbook Vol-1 (RIPv2 Labs)
Share:

Sitemap

Contact Form

Name

Email *

Message *

Total Pageviews

Search This Blog