Networking | Linux | FOSS | Note-Keeping |

Pages

Showing posts with label GNS3. Show all posts

Tuesday, April 9, 2019

Early access to new WebUi - GNS3 2.2.0 alpha 4 upgrade on Linux

GNS3 version 2.2.0 alpha 4 has been released, it gives you early access to the new web-ui with the upgrade of v2.2!

Major new features are the WebUi (read only for now), a new GNS3 VM based on Ubuntu 18.04 LTS, Hyper-V support for the GNS3 VM, new symbols (affinity theme), new template creation system, link status detection for Qemu VMs, custom adapters configuration, console support for clouds, new project import/export and much more! 


Please see What’s new in GNS3 version 2.2 for a detailed overview.

IMPORTANT NOTE to upgrade from 2.1.x and earlier versions of GNS3

Please do not upgrade if you are working on something important like a certification or something else. Understand there is no rollback possible once you open an older project in version 2.2

Backup all your projects, settings and snapshot the GNS3 VM. Version 2.2 is in alpha stage which means many things could be broken or not work as expected. Only advanced users who are comfortable with GNS3 should try this alpha release.

Linux installation

Ubuntu/Debian, install from our PPA:

sudo add-apt-repository ppa:gns3/unstable
sudo apt-get update
sudo apt-get install gns3-gui

For upgrading from the stable repository:

sudo add-apt-repository --remove ppa:gns3/ppa
sudo add-apt-repository ppa:gns3/unstable
sudo apt-get update
sudo apt-get upgrade

For upgrading from the unstable repository:

sudo apt-get update
sudo apt-get upgrade

For other Linux distributions, we recommend an installation via Pypi:

pip3 install gns3-gui==2.2.0a4
pip3 install gns3-server==2.2.0a4

This is the news I've been waiting for! For many of us this should make it easier to sneak in some lab time by just spooling up your server and then log into GNS3 via browser to lab! 


A final release is expected during the first half of 2019 and I am so excited! 

Source & Credits : Jeremy Grossmann@GNS3
Share:

Monday, November 20, 2017

GNS3 2.0.3 Error on Ubuntu 16.04LTS: IOS/IOU_name.bin%20is%20not%20executable

GNS3 2.0.3 Error Message on Ubuntu 16.04LTS:

home/rana/GNS3/images/IOU/i86bi-linux-l2-adventerprisek9-15.6.0.9S.bin%20is%20not%20executable


Some fellows came across the above error, while adding/configuring IOS/IOU on GNS3 2.0.3 and the development version GNS3 2.1.0 running on Ubuntu 16.04LTS machines. The error message is self explanatory, and just needs you to add execution rights to the IOS/IOU files in GNS3's images directory, like below and can be repeated for all IOS/IOU giving the same error:

(The below example assumes GNS3's default directories, and shows rights inclusion to L2 IOU, L3 IOU and a c7200 router IOS, just open a terminal with Ctrl+Alt+t, and do the following from '/home/user' directory)


rana@Ubuntu16:~cd GNS3/images/IOU
rana@Ubuntu16:~/GNS3/images/IOU$ sudo chmod +x i86bi-linux-l2-adventerprisek9-15.6.0.9S.bin
[sudo] password for rana: 
rana@Ubuntu16:~/GNS3/images/IOU$ sudo chmod +x i86bi-linux-l3-adventerprisek9-15.4.1T.bin
rana@Ubuntu16:~/GNS3/images/IOU$ cd ..
rana@Ubuntu16:~cd GNS3/images$ cd IOS
rana@Ubuntu16:~/GNS3/images/IOS$ sudo chmod +x c7200-adventerprisek9-mz.153-3.XB12.bin
rana@Ubuntu16:~/GNS3/images/IOS$ 

Now, open GNS3 again and add the IOS/IOU again in Preferences Tab, everything should work as intended.


HTH,
Rana Tauqeer.
Share:

GNS3 2.0.3 & GNS3 2.1.0 Error on Ubuntu 16.04LTS: uBridge is not available, path doesn't exist.

GNS3 2.0.3 ERROR:
"
uBridge is not available, path doesn't exist, or you just installed GNS3 and need to restart your user session to refresh user permissions"


Solution:

I came across the above uBridge error, while running GNS3 2.0.3 stable version (also tried the development version of GNS3 2.1.0, but stuck at the same error), on my Ubuntu 16.04LTS Machine. Applied almost all available solutions on GNS3 forums and other blogs but nothing worked. Finally, I was able to figure out the following solution, which did the charm! 

Step-1: Open a terminal (Ctrl+Alt+t), and login as root/Superuser 
rana@Ubuntu16:~$ su - 
Password: 
root@Ubuntu16:~$

Step-2: Update repository 
root@Ubuntu16:~$apt-get update 

Step-3: Install 'sudo' 
While trying and working around other available solutions, I suspect that something went wrong with 'sudo' too, this step can be exempted/skipped if 'sudo' is working correctly for you - (which can be checked with 'sudo ls' command) 
root@Ubuntu16:~$apt install sudo 

Step-4: Add the user ('rana' in my case) to group sudo 
root@Ubuntu16:~$usermod -aG sudo rana 

Step-5: Reboot the machine
root@Ubuntu16:~$reboot

Step6: After reboot, reconfigure ubridge 
rana@Ubuntu16:~$sudo dpkg-reconfigure ubridge 

Step-7: Run GNS3, test it and enjoy learning!!! 

[The same answer and other suggested workarounds related to this particular error can also be found at GNS3 Community Forums]

HTH, 
Rana Tauqeer.
Share:

Thursday, August 24, 2017

How To Run Juniper Router JunOS Olive VM image(.OVA) in GNS3

How To Run Juniper Router JunOS Olive VM image (.OVA) in GNS3


First of all, download, install and run Oracle VM VirtualBox, and GNS3 on your PC.

Secondly, download the JunOS Olive VM image from the link below:

Download JunOS image file for GNS3

(Link searched from internet and pasted here for reference only)

After downloading the JunOS VM image, open the Oracle VM VirtualBox console. Click File and select Import Appliance to import VM (or just double click on the downloaded file and run it with Oracle VM VirtualBox to Import Appliance.)

Now, click the Browse button to locate the downloaded JunOS image file, select it, and then click Next

Accept the default resource values or adjust them as per requirement, and then click Import.
(I'm using default values that came with downloaded VM.


Once the VM is imported, select it, and click Start to power on.

Note:
In case, while importing the Virtual Machine in Oracle VM VirtualBox, you get the error "could not start the machine because following physical network interfaces were not found" than click Change Network Settings, select Microsoft KM-TEST Loopback Adapter from the list, and then click OK.
(If Microsoft Lopback Adapter is not already installed, than install it via the "Add Hardware Wizard" on windows and than select it in network settings)
If this error does not occur than, skip this step.


Now, on GNS3, click Edit, and select Preferences. On the Preferences window, select VirtualBox VMs in the left pane, and then select New.
Select JunOS Olive VM (Juniper router IOS image)and click Finish.


Now click Edit, change Symbol & Category to Router. Move on to the Network tab, and set the number of adapters as per your requirement (I selected 4 here)
Also, Select the Allow GNS3 to use any configured VirtualBox adapter check box and click OK. Now again press Apply & OK.


Now, in GNS3 console GUI, drag & drop the Junos router and start it.


Switch to the JunOS VirtualBox console or go to console from GNS3. At the login prompt, type root as username and press Enter. The Password is blank
At the next prompt, type cli and press Enter, and "Show Version" to verify the Junos version.


Enjoy.

Share:

How to run Juniper Router (JunOS) .img in GNS3

Installing Juniper Router IOS (Junos) .img via GNS3 Qemu on Local Computer or GNS3 VM:


Pre-requisites
  • GNS3 installed
  • VMWare or Oracle VM VirtualBox installed (If you want to install to VM)
  • Juniper Router IOS (Junos) .img file

Adding Junos in GNS3

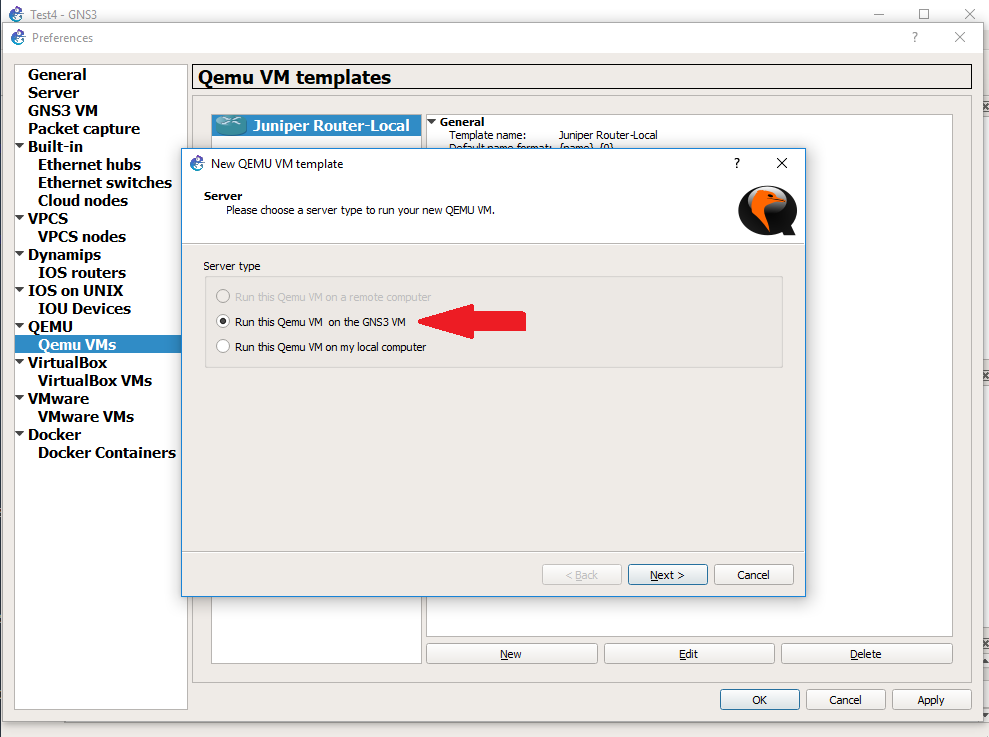
Open GNS3 and go to Edit > Preferences > QEMU > QEMU VMs

Select "Run this Qemu VM on the GNS3 VM" for running Junos on VM
or
select "Run this Qemu VM on local computer" for running Junos on local computer and press Next (I’m running it on VM here).


Name the Junos here and press Next


Select Qemu Binary and RAM here and press Next (I’m using auto-selected default Qemu binary values by GNS3 and 256MB of RAM)


Choose Consol Type here (I selected Telnet) and press Next


Now, choose basic disk image for the virtual machine, if you haven’t already chosen/uploaded it to VM than select New Image and give path to Junos.img file and it will start uploading .img file to VM. Give it some time to upload and press Finish. (I had it already uploaded to VM earlier while testing so, chose Existing Image and selected the .img file from drop down menu)
Click Apply and OK


To change the Junos Router Icon, press all devices icon from the left hand menu, select Junos router and right click on it. Click on Configure Template. Now change the Symbol from Browse option and select router icon from the list. Also, change the Category from drop down menu and select Routers.


Change Network Adapters to 4 (Maximum supported by QEMU) or according to your need and press OK.


Now, you are all set to test the settings.


Drag & Drop the Junos router to the main topology window, turn it on, and get console access. Give it some time to boot (At least 4-5 minutes)


After Successful boot, login with "root" and press enter & to enter into Junos CLI mode type "cli" and press enter. 


Enjoy!
Share:

Sitemap

Contact Form

Name

Email *

Message *

Total Pageviews

Search This Blog